Bake Bakery-Quality 6-Inch Cakes: The Freezing Secret
Imagine presenting a beautifully crafted cake that looks like it came straight from a high-end bakery, yet you made it yourself in your own kitchen. For many home bakers, achieving this level of professional polish can seem daunting. But what if we told you there’s a simple, game-changing technique that elevates your homemade creations, especially the charming
3 layer 6 inch cake, to bakery-quality status? The secret lies in your freezer.
Baking a magnificent 3 layer 6 inch cake doesn't have to be an intimidating task reserved for professional pastry chefs. With the right approach and a few clever tricks, you can create stunning, moist, and stable cakes perfect for everyday celebrations, weeknight birthdays, or just satisfying a sweet craving. This article will unveil the magic of freezing cake layers, alongside other invaluable tips, to transform your home baking from good to truly exceptional.
The Allure of the Compact 3 Layer 6 Inch Cake
In a world often gravitating towards bigger-is-better, the 6-inch cake stands out as a testament to the idea that the best things indeed come in small packages. A 3 layer 6 inch cake is not just adorable; it’s incredibly practical and versatile, making it an ideal choice for the home baker.
First and foremost, its size is perfectly suited for smaller gatherings. Whether it’s a family of five celebrating a birthday, an intimate dinner party, or simply a desire for a special dessert without an overwhelming amount of leftovers, a 6-inch cake provides a generous 6-8 servings without being excessive. It’s manageable to bake, easier to transport, and fits neatly into most refrigerators. This small-batch perfection means less waste and more joy for those who appreciate a fresh, homemade treat. If you're looking for more reasons why this size is perfect for your family, dive into our article on
Small Batch Perfection: 3-Layer 6-Inch Cakes for Families.
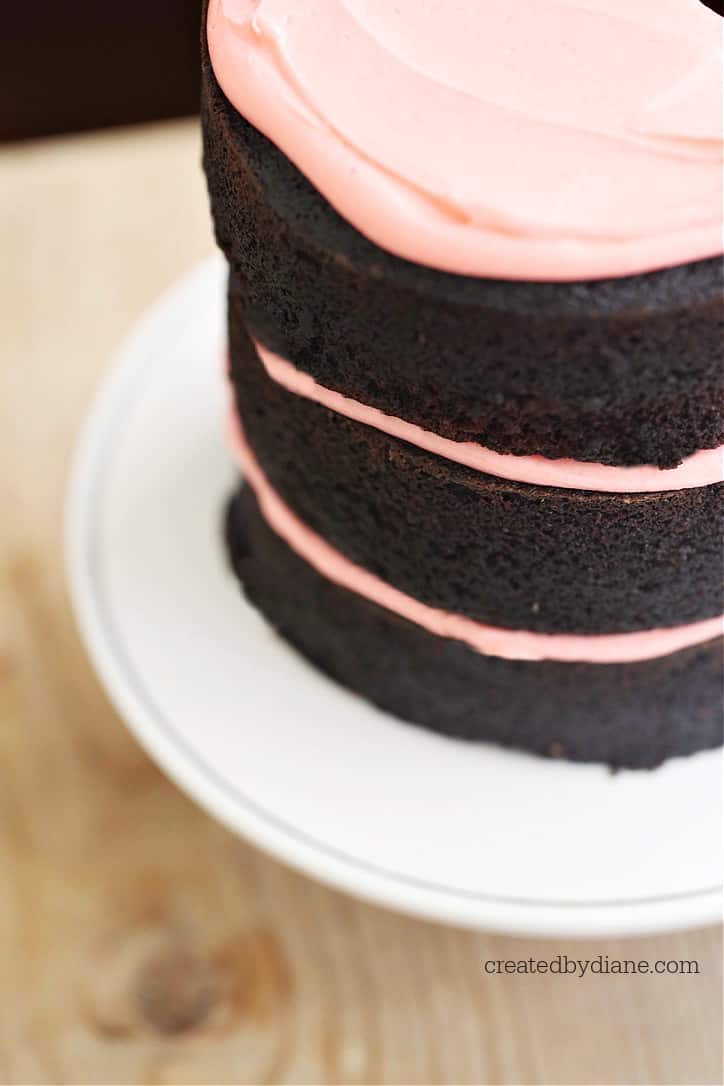
Beyond its serving size, the 3-layer structure of a 6-inch cake offers an elegant presentation that feels luxurious and visually appealing. The multiple layers allow for generous fillings, creating a delightful interplay of textures and flavors in every bite. Think of a rich chocolate cake with a soft pink frosting – a classic combination that looks both sophisticated and fun, perfect for "everyday celebrating."
And here’s a fantastic bonus that many recipes for this size cake offer: the "2-for-1" advantage. Often, a single recipe for a 3 layer 6 inch cake can yield not only your beautiful centerpiece but also a handful of delicious cupcakes. This means you can bake once and enjoy two different treats – the celebratory cake and portable snacks or desserts for later. Imagine the convenience of having six extra cupcakes ready to freeze and pull out whenever a sweet tooth strikes, or to share with a friend. Discover more about this clever baking strategy in our article
One Bake, Two Treats: 6-Inch Cake Plus 6 Cupcakes.
The Game-Changer: Freezing Your Cake Layers
This is where the magic truly happens, transforming your homemade cakes from good to genuinely outstanding – the kind that leaves people wondering if you secretly bought it from a professional bakery. Freezing your cake layers before decorating is a technique embraced by professional bakers, and for good reason. It addresses common home baking woes and ensures a superior final product.
Moisture Retention: The Key to a Delicate Crumb
One of the most common complaints about homemade cakes is dryness. Freezing acts as a moisture seal. As the cake layers cool and are then tightly wrapped and frozen, the moisture within the cake batter locks in. This process prevents the cake from drying out, even if you’re baking a few days in advance. The result is an incredibly moist, delicate crumb that melts in your mouth, just like a freshly baked cake. Say goodbye to crumbly, dry cakes forever!
Structural Integrity & Effortless Handling
Soft, freshly baked cake layers can be a nightmare to handle. They're prone to tearing, crumbling, and can make stacking a wobbly, frustrating experience. This is where freezing truly shines. When your cake layers are firm from being frozen, they become significantly easier to work with.
- Easy Leveling: A firm, cold cake is much simpler to level with a serrated knife, ensuring perfectly flat surfaces for stacking.
- Stable Stacking: Frozen layers stack beautifully without sliding or collapsing. This allows for clean, straight tiers, which is crucial for a professional-looking 3 layer 6 inch cake.
- Crumb-Free Frosting: Frosting a crumbly cake can lead to dreaded "crumb coat" nightmares. A frozen cake is less likely to shed crumbs, allowing for a smoother, cleaner frosting application.
- Precise Slicing: When it comes time to serve, a firm, slightly chilled cake slices much more cleanly, giving you those perfect, intact portions that look as good as they taste.
How to Freeze Your Cake Layers Like a Pro:
- Cool Completely: This is non-negotiable. Attempting to wrap a warm cake will trap steam, leading to soggy spots. Allow your cake layers to cool completely on a wire rack for at least 1-2 hours.
- Wrap Tightly: Once cool, wrap each cake layer individually and very tightly in plastic wrap. Use at least two layers of plastic wrap to create a secure seal.
- Add a Second Layer of Protection: For longer freezing times (beyond a day or two), wrap the plastic-wrapped layers again in aluminum foil. This provides an extra barrier against freezer burn and odor absorption.
- Freeze: Place the wrapped layers in the freezer. They can be frozen for an hour or two until firm enough to work with, or stored for several weeks, ready to be defrosted and decorated whenever you are.
When you’re ready to decorate, simply remove the wrapped layers from the freezer and let them thaw slightly at room temperature until they are firm but pliable – still very cold, but not rock-hard. This usually takes about 30-60 minutes, depending on your environment.
Mastering Your Frosting & Decoration
With perfectly baked and frozen cake layers ready, the stage is set for an enjoyable decorating experience. While freezing ensures structural integrity, a few tips on frosting and decoration can elevate your 3 layer 6 inch cake even further.
First, let's talk about the foundation. To get those beautiful, flat layers that stack effortlessly, consider using
baking strips. These moist strips wrap around your cake pans, ensuring even heat distribution during baking, which in turn prevents doming and dry edges. Flat layers mean less need for trimming and a more stable, level cake.
Next, the frosting itself. Traditional American buttercream can sometimes be overly sweet or have a slightly granular texture. A fantastic trick to achieve a smoother, lighter, "faux Swiss meringue" feel is to create a slurry with your powdered sugar and liquid (milk or cream) before adding it to your butter. This ensures the sugar dissolves more completely, resulting in an irresistibly silky, creamy, and less overtly sweet buttercream. Remember to mix your frosting for several minutes until it’s fully smooth and whipped to a light, airy texture. This aeration is key to that desirable "light-as-air" mouthfeel.
When it comes to aesthetics, the choices are endless. A soft pink frosting on a rich chocolate 3 layer 6 inch cake is a classic for a reason – it's both sophisticated and fun. But feel free to explore! Add fresh flowers, playful sprinkles, or pipe a decorative trim to fancy it up. The beauty of a homemade cake is its personal touch.
Finally, a secret weapon every home baker should embrace:
sprinkles! When decorating, especially if you’re new to the craft, imperfections are bound to happen. A little smudge here, an uneven spread there – don’t fret. Sprinkles are a cure-all. Pile them on, scatter them artfully, or use them to cover a less-than-perfect spot. They add instant festivity and charm, diverting attention while making your cake look even more delightful. Remember, frosting a firm, chilled cake makes the process infinitely easier, allowing the buttercream to glide on smoothly without tearing at the cake’s delicate surface.
Beyond Perfection: Embracing the Joy of Home Baking
While striving for bakery-quality results is commendable, it’s crucial to remember that unless you're selling your cakes or they're destined for a grand wedding, perfection isn't the ultimate goal. The most important ingredients in any homemade cake are the love and care you put into it.
Your cakes will be eaten, savored, and enjoyed. The most enduring memory will be the taste and the thought behind it, not a microscopic flaw in the frosting. So, give yourself permission to have fun! Make the cake the way you want to, experiment with flavors and decorations, and don't be afraid to slather on more frosting if that’s your preference.
The "Did you buy this at a bakery?" compliment is certainly a wonderful feeling, and using the freezing secret will undoubtedly help you achieve that. However, the true reward lies in the act of creating something delicious with your own hands and sharing it with loved ones. Embrace the process, learn from each bake, and infuse your creations with joy.
Conclusion
Baking a bakery-quality 3 layer 6 inch cake at home is not a pipe dream. By understanding the immense benefits of freezing your cake layers – from locking in moisture to providing structural integrity for easy handling and decoration – you unlock a world of professional-looking results. Couple this with smart frosting techniques, a readiness to embrace a little creative imperfection, and the sheer joy of home baking, and you'll be creating cakes that are not only beautiful but truly delicious. So, next time you plan to bake, remember the freezer – it's your secret weapon for transforming ordinary bakes into extraordinary treats.